AR End of Month
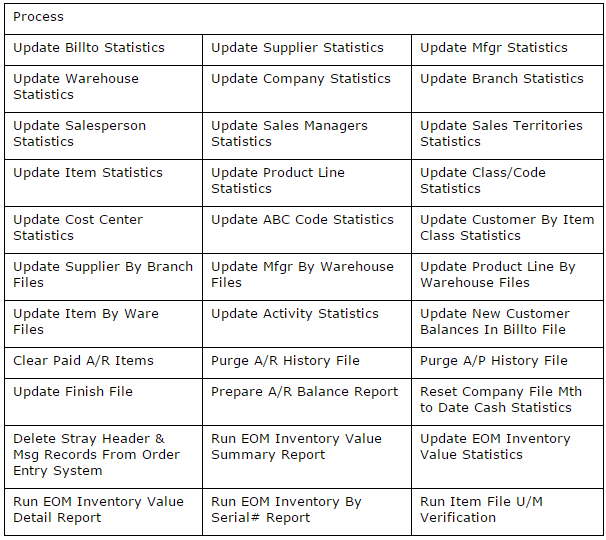
System Processes that Happen when EOM is done
Checking Status of the EOM job
Granting Access
Access is granted at the Authority Class level.
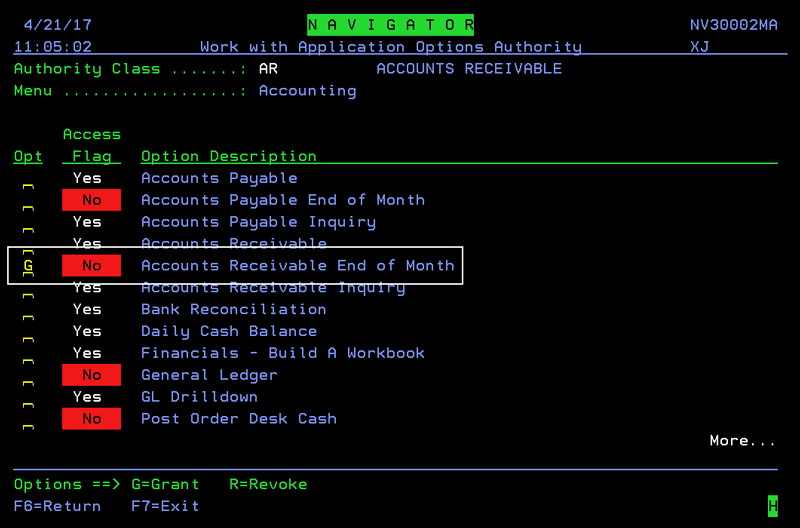
1. On the Navigator menu, select option 2 (NAV 2).
2. Enter a W - Web Apps in the Opt field of the Authority Class you want to work with.
3. Enter a W - Work w/Opts for the Accounting application.
4. Enter a G to grant access to the Accounts Receivable End Of Month functionality.
AR End of Month Processes
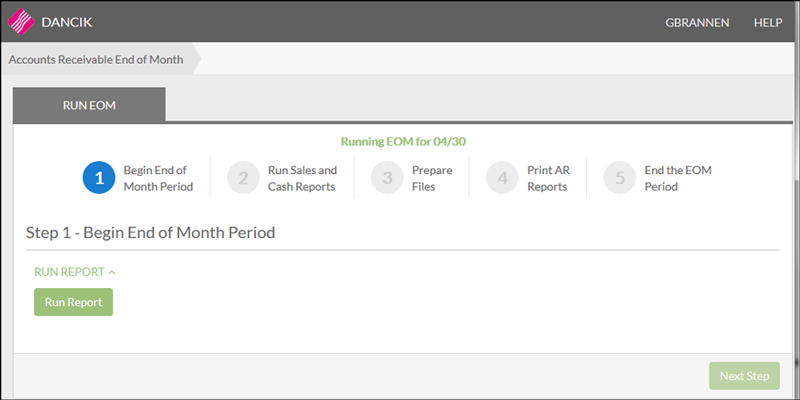
- Access the Accounts Receivable End of Month application under the Accounting within Navigator.
- The first window to appear lets you start the EOM process.
- Click Run Report to produce a Balance Report. The Balance report checks that the system is in balance.
- Review the Balance Report to ensure AR is ok to update. If it is, check the I have verified the AR Balance Report is in balance box. When the box is checked, the Update AR Balance button becomes active.
- Click Update AR Balance to begin the EOM process for the current month.
- Click Next Step to proceed to Step 2 of the process where we will generate Cash and Sales reports.
- The following Sales Reports are automatically generated:
- AR Monthly Transaction Code Summary - Provides an in-depth analysis and total of each AR transaction code used during the month.
- AR Monthly Transaction Code Summary by Branch - Breaks down the transaction code activity by branch.
- Invoice#s & Other Number Spans Used This Month
- Invoice Register - List all the invoices included in the EOM.
- You can choose to run all, some or none of the following optional reports:
- Monthly Sales by Invoice Date
- Monthly Sales by Transaction Code - This report sorts and sub-totals cash receipts by the transaction codes of the sales transactions the cash was applied to. For example, you can list how much cash was applied against regular invoices, versus direct ships, versus interest charges. If you would like to track how much payment you have received against interest charge invoices, this report shows that figure as the subtotal of transaction code 0X, which is the code for interest or service charges.
- Monthly Audit Report - Sales to other than assigned branch
- Monthly Sales by Customer Account Number
- The following Cash Reports are automatically generated:
- AR Miscellaneous Cash/Acct# 99999 Analysis – Suggested GL Entries
- AR Monthly Cash By Bank Summary
- AR Miscellaneous Cash/Acct# 99999 Analysis – Detail Version
- AR Monthly Cash By Deposit
- You can choose to run all, some or none of the following optional reports:
- Monthly Cash by Payment Date
- Monthly Cash by Payment Transaction Code
- Monthly Cash by Sales Transaction Code
- Monthly Cash by Customer Account Number
- Monthly Audit Report - Cash to Other than Assigned Branch
- Print Addition Copy of Monthly AR Summaries
- Unapplied Advance Deposit Listing
- Click Next Step to proceed Step 3 - Prepare Files.
- A - Update Customer Files with Interest/Service Charges - Accumulated interest charges can be applied to each customer account number. The interest rate comes in from the Mthly Interest Rate % field of the Customer's BillTo File. This option is a memo-only approach, in which monthly statements show the interest amount due, but accounts receivable is only updated when interest is paid.
- If option A is selected, the screen refreshes to ask the question Would you like to print detail list of all past due invoices?
- B - Post Interest/Service Charge as Invoices to AR - This options creates invoices for the accumulated monthly interest charges. The invoice can be sent to each past due account, which is posted to accounts receivable and is tracked just like a regular invoice. If you use Method B, you have the option of running interest program at any time of the month. Therefore, if you run it mid-month, do not run it again now.
- If option B is selected, the screen refreshes to ask the question Would you like to print interÂest/service charges? This report shows each customer's interest rate and new monthly interest charge. You should keep this report, in case you need to show how you arrived at the interest level for an account. Interest is applied only to your choice of Past Due, Over 15, Over 30, or 45-day balance due.
- C - Skip (Interest/Service Charges are Posted Nighty) - Interest/Service Charges are calculated on a per invoice basis, and are charged as soon as an invoice passes its due date. If option C is selected, the screen refreshes to ask the question Would you like to print detail list of all past due invoices?
- Click Next Step to proceed to Step 4 - Print AR Reports.
- AR Aging Report By Company#/Account - sorted by customer account number within the company. Shows only a summary-only one or two printed lines-for each account. The summary includes total balance and an aging breakdown (over 30, over 60, over 90). This report also shows the average age of the AR.
- AR Aging Report By Branch/Customer - sorted alphabetically by customer name within branch. Shows a summary-one or two printed lines-for each account. The summary includes total balance and an aging breakdown (over 30, over 60, over 90).
- Statements and Collection Letters - If your company does not utilize these, you may skip this option. The Billto File Statement Code assigned in the Billto File determines the type of statement the customer receives.
- Ledgers - This option allows you to print a copy of each customer's ledger. The ledgers include a complete current picture of the account, including a list of all open transactions in chronological order and a summary aging into Future, Current, Over 30, and Over 60. In addition, the ledger includes any descriptions or customer PO numbers entered with the sales and customer statistics for current year and previous year.This can be a very lengthy report so if possible save it to a spool file and only print if necessary.
- AR Detailed Aging Report - Shows each open item within each listed account, and ages each item separately. It is strongly recommend that you run this option and save to your spool file. Remember, the system can only run aging reports and capture the aging at a given point in time. Since this is month end, this is a report that you may need to refer back to at later dates, and may be a report requested by auditors.
- Select a Saved Report from the drop down listing for each report.
- Click Next to proceed to the Step 5; the last step of the AR EOM process.
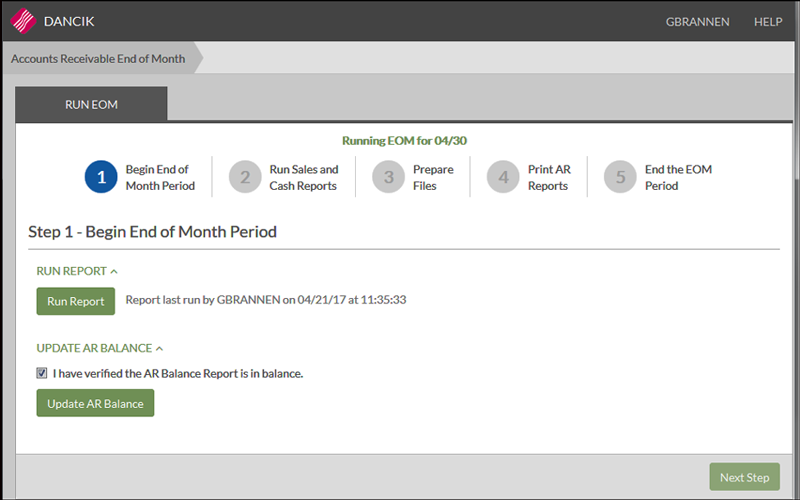
An error message appears when selecting Update AR Balance if AR is out of balance.
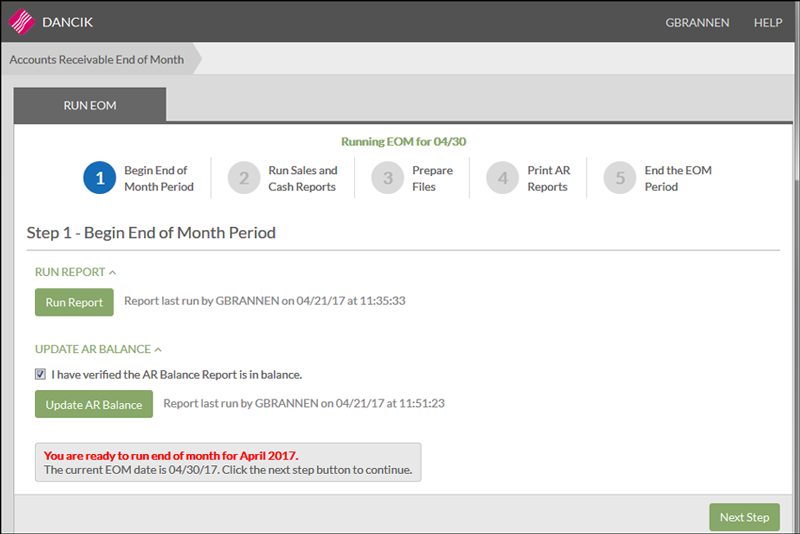
A flag is set on the system that prevents other users from accidentally posting additional information.
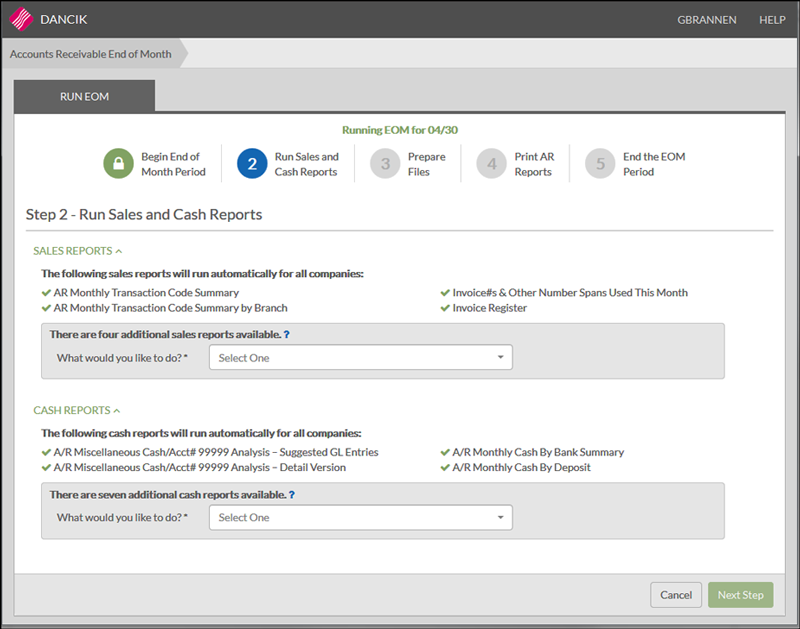
These reports can be run on demand via the AR End-Of-Month Style Cash and AR End-Of-Month Style Sales reports in the Navigator Reporting application.
This step prepares files for the other EOM reports, recalculates aging dates, and optionally assesses interest charges for your system. A report listing the interest charge calculations is generated.
After selecting an aging option for calculating interest/service charges, you can select how you want to apply those charges.
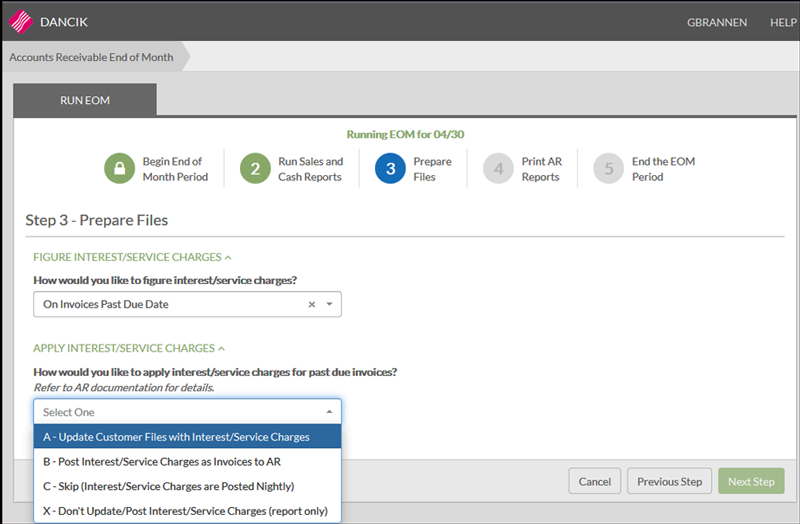
The Apply Interest/Service Charges option determines how to calculate service (interest) charges to the customer accounts. Before running this option, you must be familiar with the aging options set for your system. You must know how your system ages invoices before deciding which options to take. If you will be assessing interest/service charges, you must also know which method to use.
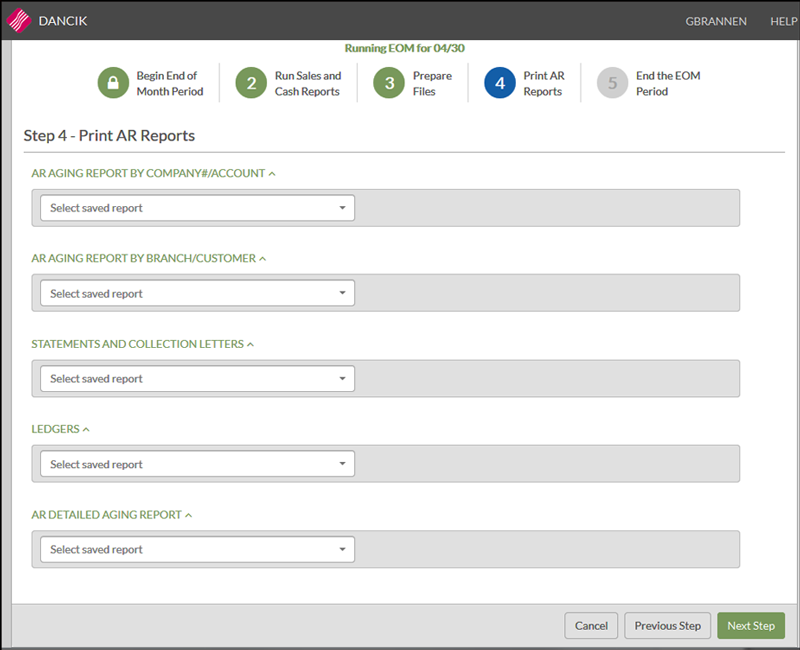
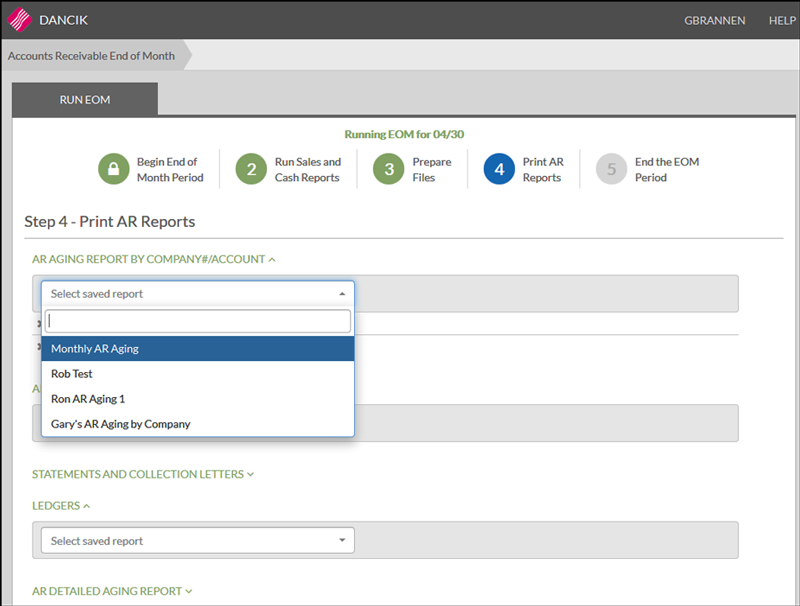
Reports are saved through the Navigator Reports application.
Only Saved reports can be selected and generated. If a saved report is not selected for a report type (i.e. Statements and Collection Letter) no report is generated.
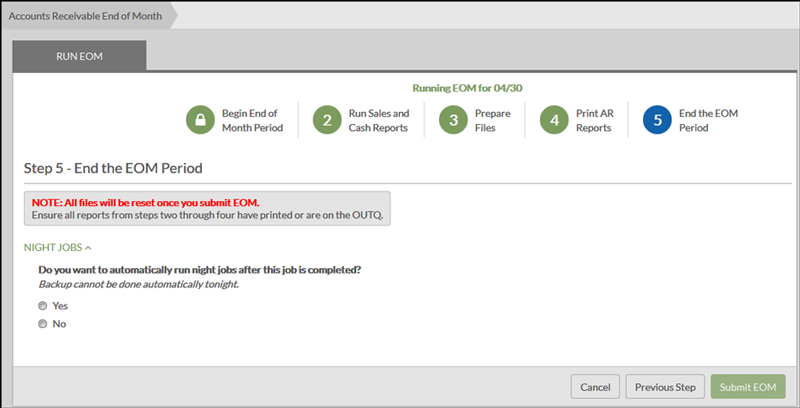
This step actually closes the month and resets all of the A/R files, Order files, and Inventory files for the new month. It also removes old history records. Open transactions are not affected regardless of how old they are. All workstations, except for the one running EOM, must be signed off. Because this step can take a few hours to run, we recommend that you run it at night before running the Night Jobs. Because of the extensive processing and file updates that are run within this step, you should report any power failure or error message immediately.
You can use the Do you want to automatically run night jobs after this job is completed option to automatically run night jobs as part of the final step of your end-of-month procedures.
You should only run EOM and Night Jobs together if your system can finish both jobs before the next business day.
Canceling EOM Process
If the end of month process is canceled and restarted after reports have been created in Steps 2 or 4 it is recommended that the reports be recreated. This is to ensure that the reports match the month end process that was actually completed.
If the end of month process is canceled and restarted after Step 3: Prepare Files for EOM has been performed then you will need to select the Skip Interest/Service Charge Calculation option on the subsequent pass through Step 3 (unless of course you selected that option the first time through the process). This is because Step 3: Prepare Files for EOM updates system files and can cause data issues if it is run more than once (this same issue can occur during the Green Screen End of Month process with menu option EOM 5).
System Processes that Happen when EOM is done
Checking Status of the EOM job
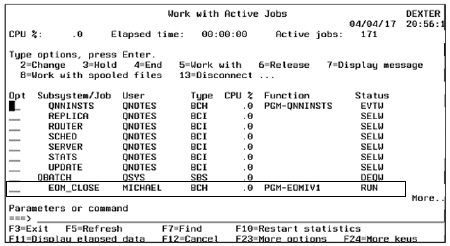
On the Green Screen use the command WRKACTJOB.
Page down until you see the Subsystem Qbatch. You should see the job in a Run Status. You can press the F5 key to refresh the screen and see the job running.
When AR EOM is complete, use the command DSPLOG to see notes in the joblog indicating that this job completed successfully.
Associated Files
- System Wide Settings - Options for Valid AR/AP EOM Date Ranges - This option prevents the entry of an incorrect End-Of-Month date when closing out a month in either the AP or AR systems.
- Company Settings - Option 2 - AR and Credit Options - Contains settings that affect AR.
- Output Distribution System (ODS) - Includes options that allow you to grant or deny the ability to send AR documents. Also included are options to assign fax and email overlays to AR statements.
